Repair Micro USB cable
Crap. Your recable has a broken cable? Sure, that's annoying at first - but it's not a big problem! Because recable is a repairable charging cable. With a few simple steps (and a few simple tools) you can easily repair it yourself.
Why is this a good idea? By repairing your charging cable, you are doing something good for the planet. Because you avoid electrical waste and conserve resources. You also don't need to buy a new cable and save money. A win-win situation for you and the environment!
Ready? - Then let's get started!
Difficulty: easy
Time required: 20 - 30 min
What you need

- Side cutters
- Combination pliers
- Cutter knife
- Lighter
- heat shrink tube
(We use a shrinkage ratio of 3:1 with an initial diameter of 9.5 mm. Can be found here ).
Tip: If you are missing one of the tools, you don't have to buy a new one. Instead, borrow it from neighbours, friends or your family. Maybe there is a repair café near you that can help you.
Let's go!
Step 1

- Unplug recable from the power supply, disconnect the power supply.
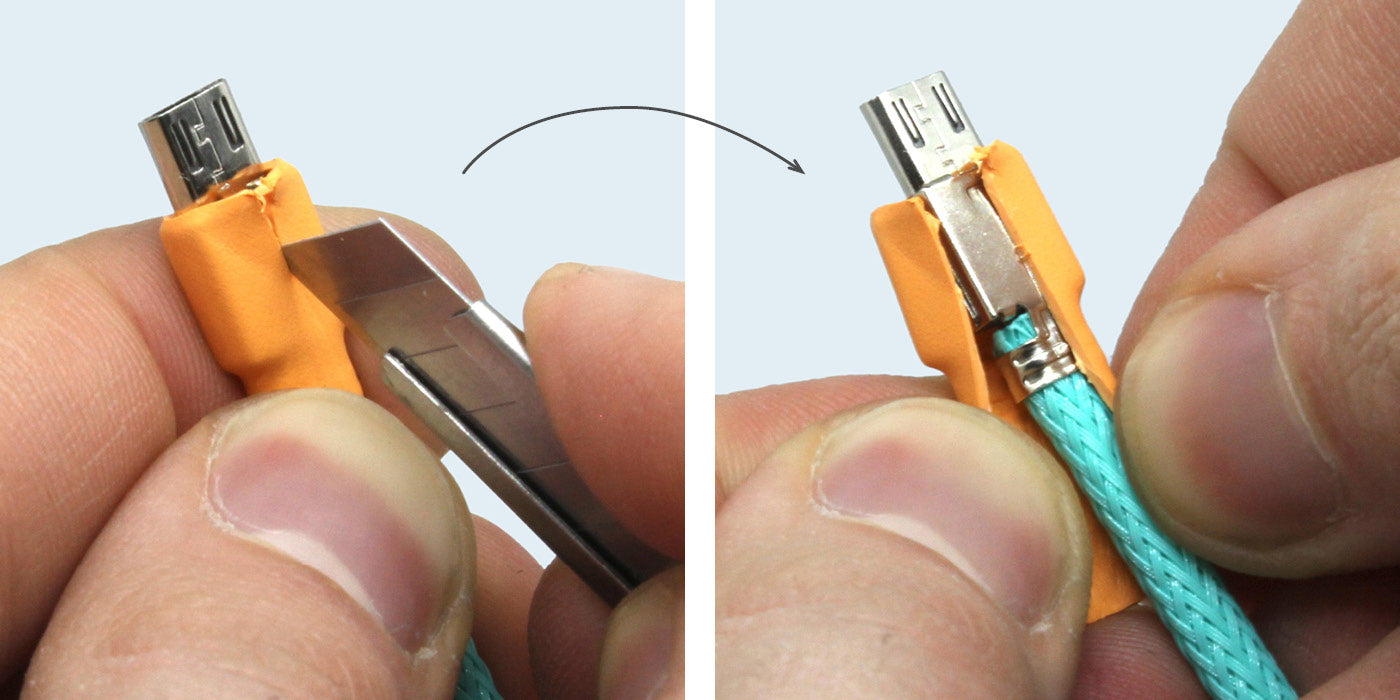
- Carefully cut the heat shrink tube lengthwise with the cutter-knife.
- Peel the heat shrink tube from the connector housing with your fingers.
Step 2

- Use the cutter-knife to bend open both clips of the strain relief.
- Run the cutter between the casing fastener.
- Carefully guide the top back over the catches.
Step 3

- Carefully bend the metal casing open with your fingers - not too far, otherwise the metal hinge will break. Take off the casing.
- Open the insulation displacement termination with the cutter by levering the inner part (turquoise) over the catch points.
Be careful, the plastic breaks quickly!
Step 4

- Pull the strands out of the insulation displacement termination.
- Cut the cable cleanly with the side cutter.
Step 5

- Expose the cable with the side cutter to approx. 1.5 cm.
- Fuse the ends of the braided hose together with the lighter.
- For the natural fibre braided sleeves, you may need to use a strip of Washitape to secure the braided sleeve against unravelling.
Step 6

- Expose the strands over a length of 8 mm.
- Carefully cut the sheath of the cable all around with the cutter (not too deep!) and pull it off with your fingers.
- Sort the strands by colour in the following order:
red (power supply)
white (data-)
green (data+)
black (GND)
Step 7

- Push the strands into the insulation displacement termination.
The holes are marked r(red), w(white), g (green) and b (black). - Press the insulation displacement termination together with the Combination pliers . Make sure that the cutting clamp sits flush.
- Now smooth out the braided sleeve on the cable until it reaches the connector.
Step 8

- Place the casing around the insulation displacement termination and close it with your fingers.
- Press the housing together with the Combination pliers . The latching points close the housing.
Step 9

- Place the stranded wire of the shielding in the strain relief.
- Press the clamps of the strain relief firmly with the Combination pliers .
Step 10

- Now slip the heat shrink tube over the Micro-USB plug and shrink it with the lighter.
Do not get too close with the flame. The heat shrink tube will otherwise become sooty. To avoid this, you can also use a heat gun instead of the lighter.
You did it!
By repairing your recable, you have made a small but important contribution to environmental protection. That's great!
Where to put the rubbish

If you should have broken something during the repair, you will find here Spare parts.
