Repair Micro USB cable
Darn. Your recable has a cable break? Sure, that’s annoying at first – but not a big problem! Because recable is a repairable charging cable. With a few simple steps (and basic tools) you can easily repair it yourself.
Why is this a good idea? By repairing your charging cable, you do something good for the planet. Because you avoid electronic waste and conserve resources. Also, you don’t have to buy a new cable and save money. A win-win situation for you and the environment!
Ready? – Then let's get started!
Difficulty: easy
Time required: 20 - 30 min
What you need

- Side cutter
- Combination pliers
- Utility knife
- Lighter
-
heat shrink tube
(We use a heat shrink tube ratio of 3:1 with an initial diameter of 9.5 mm. Here to find.)
Tip: If you are missing one of the tools, you don't have to buy it new. Instead, borrow it from neighbors, friends, or your family. Maybe there is also a Repair Café near you that can help.
Let's get started!
Step 1
- Unplug recable from the power supply, interrupt the power.
- Carefully cut the heat shrink tube lengthwise with the cutter.
- Peel the heat shrink tube off the connector housing with your fingers.
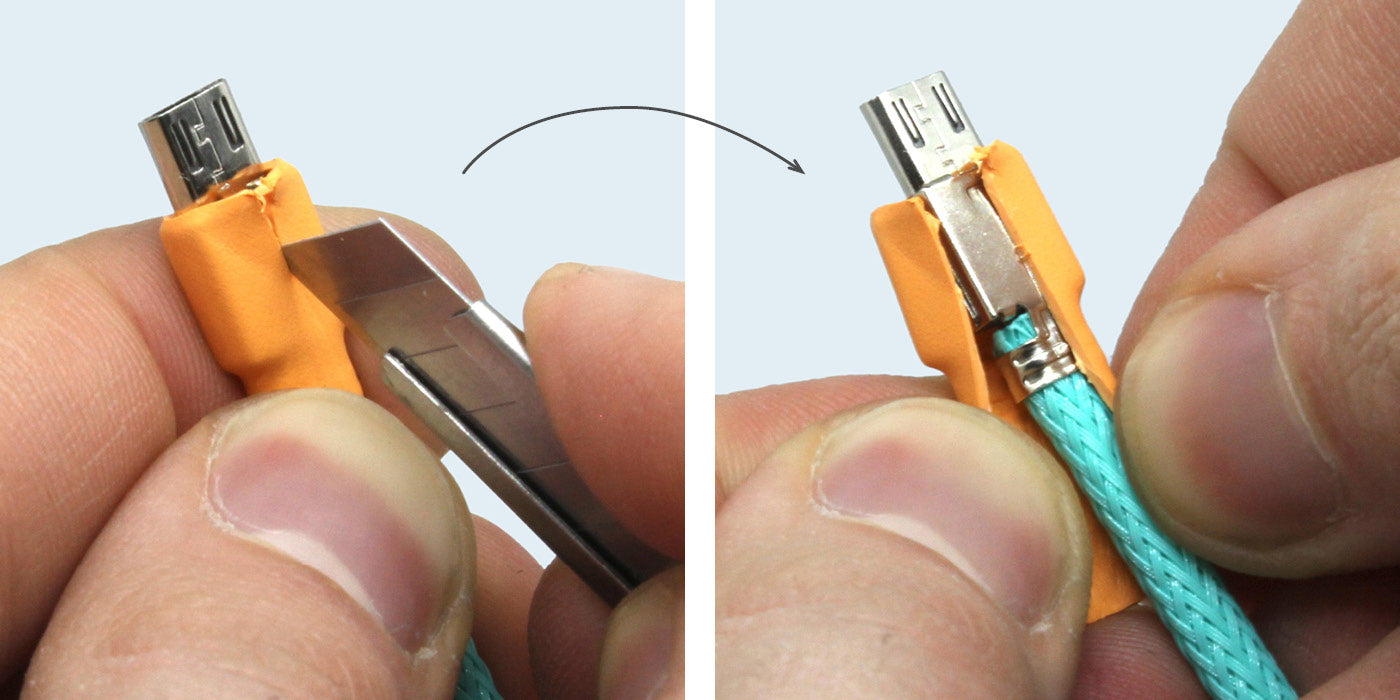
Step 2

- Use the cutter to bend open both clamps of the strain relief.
- Run the cutter between the housing closure.
- Carefully guide the top back over the locking tabs.
Step 3

- Carefully bend open the metal housing with your fingers – not too far, as the metal hinge might break. Remove the housing.
- Open the cutting clamp with the cutter by levering the inner part (turquoise) over the locking points.
Caution, the plastic breaks easily!
Step 4

- Pull the strands out of the cutting clamp.
- Cleanly cut the cable with the side cutter.
Step 5

- Expose the cable with the side cutter to about 1.5 cm.
- Melt the ends of the braided sleeve with the lighter.
- For natural fiber braided sleeves, you may need to use a strip of Washi tape to secure the braided sleeve against fraying.
Step 6

- Expose the strands over a length of 8 mm.
- Carefully score the cable jacket all around with the cutter (not too deep!) and pull it off with your fingers.
- Sort the strands by colors in the following order:
red (Power supply)
white (Data-)
green (Data+)
black (GND)
Step 7

- Slide the strands into the cutting clamp.
The holes are marked with r (red), w (white), g (green) and b (black). - Press the cutting clamp together with the Combination pliers. Make sure that the cutting clamp sits flush.
- Now smooth the braided sleeve on the cable up to the plug.
Step 8

- Place the housing around the cutting clamp and close it with your fingers.
- Press the housing together with the Combination pliers. The locking points close the housing.
Step 9

- Place the shielding wire into the strain relief as well.
- Press the strain relief clamps firmly together with the Combination pliers.
Step 10

- Now slide the heat shrink tube over the Micro-USB plug and shrink it with the lighter.
Do not bring the flame too close. Otherwise, the heat shrink tube will get sooty. To avoid this, you can also use a hot air gun instead of the lighter.
You did it!
By repairing your recable, you have made a small but important contribution to environmental protection. That is great!
Where to put the waste

If something should have broken during the repair, you will find here Spare parts.